Showing posts with label farmhouse table. Show all posts

Tuesday, May 6, 2014

Union Jack Dining Table

I feel lately as if I have been “jack of all trades and master of none.”  I’ve had a million things going on at once, and it doesn’t seem like I’m FINISHING anything.  Or…if I am finishing anything…I’m not doing a very good job of it.  Ugh!

But am I popping in this afternoon to show one thing that IS done and that I AM happy with!

Red Hen Home Union Jack Table 1

A couple of months ago I purchased a table at a thrift store because it was on great, chunky turned legs. 

Red Hen Home Union Jack before 2

It wasn’t as big as I wanted it to be, so I pulled off the legs to use for another future table project.   You can see the top wasn’t in great shape, but it was certainly salvageable—so I did just that!  I stripped and sanded it down to bare wood.

Red Hen Home Union Jack before 1

I built a new table base out of stock lumber.  I’ve  had some questions about what the underside of my tables look like—here’s a peek.  I put in some cross-braces of 2x2’s to hold everything square and sturdy.

Red Hen Home table base

I also played around a little bit with my table legs, cutting each with a single taper.  I really like how they turned out!

Red Hen Home tapered legs

Then I got a little crazy with painter’s tape!  Sorry; I didn’t take a picture of that part!  I used a reference picture, a ruler, and a straight-edge and pretty much “winged it.”  This is how it looked right after two colors of stain were applied (Minwax Dark Walnut and Mahogany).

Red Hen Home Union Jack Table 9

The next day I stained the whole thing with that custom gray-brown mix that I am fond of.  As much as I liked the bold colors—there were definitely spots were there was a little bit of bleeding under my tape.  The new stain helped blur the boundaries a little bit, as did distressing the heck of of the whole thing!

Red Hen Home Union Jack Table 10

And this is what I ended up with…

Red Hen Home Union Jack Table 8

Red Hen Home Union Jack Table 2

Red Hen Home Union Jack Table 4Red Hen Home Union Jack Table 5Red Hen Home Union Jack Table 6

My kids are the biggest fans of this table (mostly because they’re big fans of Dr. Who and Sherlock) and keep asking, “Can we keep it??”

I am tempted…but I’m afraid not!  So hopefully it will soon find the home of another Anglophile to reside in!

Red Hen Home Union Jack Table 7

Linking up here:

  Elizabeth & Co.
Primitive & Proper  
Friday Remodelaholic The Scoop!
Funky Junk’s Saturday Night Special The DIY Show Off
Miss Mustard Seed
Beyond the Picket Fence  
Knick of Time
 
Common Ground My Repurposed Life
  Mod Vintage Life

Monday, March 17, 2014

Charcoal Farmhouse Table & Aqua Benches

If you follow me on Facebook, you may have gotten a sneak peek at some of the furniture adventures I was up to last week!  Bought some, sold some, and did a lot of hauling in between.  Hopefully the ones I kept will be showing up here on the blog one of these days soon.

In the meantime, I have finished up another farmhouse table for my friend Kim.

Kim's Farmhouse Table 007

This one is similar to Stacy’s table, although not as wide—but I did cut off the rounded edges of the stock lumber (with my table saw) for a smoother top.

Kim's Farmhouse Table 001

Kim wanted a dark grayish-black color for her table, and I think we ended up with a pretty good charcoal.  This was achieved by first staining it all with Rustoleum Black, then a layer of Weathered Gray (well rubbed in), followed by another very light coat of black with an almost dry rag.

Kim's Farmhouse Table 004

I built two benches for her as well (the plans are out of Ana White’s Handbuilt Home book).

Kim's Farmhouse Table 009

I made a DIY chalk paint with the leftover paint from my daughter’s bedroom makeover.  After distressing, I wiped Rustoleum weathered gray stain over all.  It helped color the exposed raw wood, and dulled the color of the aqua a little bit.

Kim's Farmhouse Table 002

I really like how using some of the same stain over the painted benches makes everything “go” together!

Kim's Farmhouse Table 003

It was fun to step away from the brown stains for a little bit!

Kim's Farmhouse Table 012


**********************

Linking up here:

The Inspiration Exchange Elizabeth & Co.
Primitive & Proper  
Friday Remodelaholic The Scoop!
Funky Junk’s Saturday Night Special The DIY Show Off
Miss Mustard Seed
Beyond the Picket Fence Coastal Charm
Knick of Time
Domestically Speaking
Common Ground My Repurposed Life
  Mod Vintage Life

Wednesday, February 26, 2014

Wide Farmhouse Table

When my family first moved to Clearfield, Utah, in 2003, I was lonely and needing a friend.  Thankfully, I found one in a neighbor and fellow church member (Stacy) who lived just down the street, and we have enjoyed a steady friendship ever since, despite the fact that they moved away from Utah years before we did.  Our move to Washington, however, brought us within 3 1/2 hours of each other, and we have found many excuses to burn up the road between Portland and Seattle since then!

Back in 2011, I refinished a table for Stacy’s family, seen here.  Shortly thereafter, though, they added a fifth child to the family—and there was no room for him to have a seat at the table!  In addition, a small antique table didn’t really provide enough room for both plates AND food, so it was time for a change.

Enter the “wide” farmhouse table.  The space for a table was limited in length, but there was actually a fair amount of width to work with so Stacy had the brilliant idea of making a table that could accommodate two chairs on each end.

Stacy's Table 007

The table is 50” wide by 72” long.  The top is made out of various board widths, and I used my table saw to rip 1/2” off each side to get rid of the rounded edges that stock lumber has.  It makes for a nice smooth table top—but I lost the look of the random width boards because it turned out so smooth!

I distressed the table with chain, hammer, needle-nose pliers, screwdriver, and a Dremel tool.  It was stained and sanded down about five times (no kidding) because I had a hard time finding a color I liked—that I thought she would also like!  In the end, it’s basically Rustoleum American Walnut, sanded back, followed by Rustoluem Wheat (we’ll ignore the layers of black, willow, weathered gray, and paint).  It’s finished with Minwax Hand-Rubbed Polyurethane and Dark Paste Wax.

Red Hen Home Table 9 009

I bought a set of four pressed-back chairs off of Craigslist.  I liked them because they were in a dark stain to begin with, rather than a medium oak.  I painted them with  SW Creamy.  As I was painting the chairs one afternoon, I kept thinking to myself, “I HATE painting chairs!  This is why I don’t paint chairs!!”

But the next day, when I was distressing them and glazing them, I thought, “These are so pretty!  I should refinish more chairs!!”

It’s confusing to be me!

Red Hen Home Table 9 006

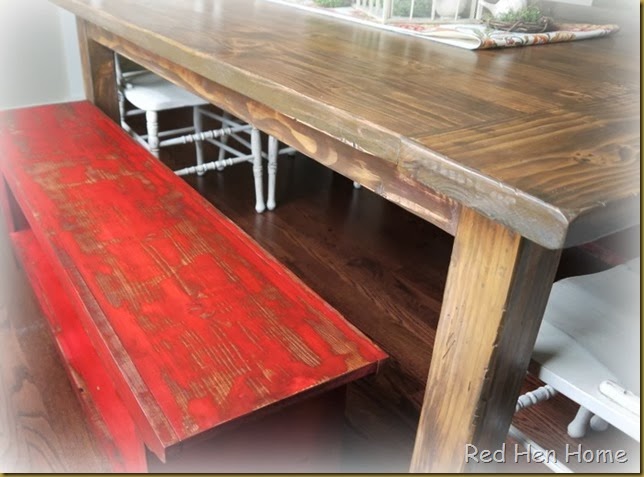
I built the benches based on the plans in Ana White’s Handbuilt Home book (adjusted for size).  The picture on the left shows what they looked like when Stacy came to see the table…and the picture on the right is what they looked like when she left with them!

bench collage

I had first stained the benches with Rustoleum American Walnut, and then I used MMS Milk Paint in Tricyle over top.  I really, really didn’t like the way the color turned out.  Even with dark wax on top, it was a bright tomato-y red, and not a deep dark red like I love. 

Stacy's Table 001

Stacy wanted them to have more wood showing anyway, so between the two of us we sanded them some more (I may have sanded them a LOT more than Stacy was anticipating, but she graciously went with it), and then we rubbed more of the American Walnut stain over all.  It colored the wood where it had gone to bare wood, and it deepened the color significantly.  It looked MUCH better, and blended better with the overall look of the set.
Stacy's Table 002

At least, I think so!

Stacy's Table 004

The table, chairs, and benches made it safely to Portland this past weekend.  We managed to fit all of them…plus a copper boiler, four big shopping bags full of dishes, and Stacy’s LUGGAGE (which is always significant) in a Honda Odyssey!  And knowing that the table is 50” wide—and a Honda Odyssey is only 49.5” wide…you should be VERY IMPRESSED by that fact!

Red Hen Home Table 9 003

Stacy has hosted guests for dinner twice since she’s been home, and a batch of homeschoolers besides.  One night she had room for nine people, three pizzas, salad, a pitcher of lemonade, and I don’t know what all else!

I feed eight people all the time.  Maybe I need a wide farmhouse table too!

******************

Disclaimer:  Stacy may or may not be my friend’s real name.  And if it isn’t, she may or may not have preferred to be called Princess Leia and/or Hot Rod.  And she may or may not be a hobbit.

**********************

Linking up here:

The Inspiration Exchange Elizabeth & Co.
Primitive & Proper  
Friday Remodelaholic The Scoop!
Funky Junk’s Saturday Night Special The DIY Show Off
Miss Mustard Seed
Beyond the Picket Fence Coastal Charm
Knick of Time
Domestically Speaking
Common Ground My Repurposed Life
  Mod Vintage Life

Thursday, February 20, 2014

The Incredible Shrinking Table

I have been working on another Farmhouse Table for a dear friend over the last couple of weeks.  It is allll-most done.  I think.  It’s way  more stressful to build for someone you know, you know??  Anyway, I am anxiously waiting for my daughter to get home so she can help me haul it in the house so I can finish poly-ing and wax-ing it.  It’s about 45 degrees outside, and things are taking too long to dry!

Anyway, working on this latest table (#9, if we’re keeping count), reminded me that I never showed table #8.  That’s probably because it is nothing really new or different than the other farmhouse tables I’ve built…but also because the blasted thing drove me crazy.

Back before Thanksgiving, I realized I had enough leftover wood to make a table base.  So with only a few extra dollars (OK, maybe $50) to buy wood for a top, I could make another table to fill my empty dining room.

Red Hen Home Table 8 001

And so I did.  I assembled the base, the top, brought them inside and put them together…

But something was wrong.

Red Hen Home Table 8 005

If you really look closely at the two preceding pictures, you might be able to see it.  The breadboard ends were crooked!  I have no idea how it happened, but both of the ends took off at a slant.

I tried to convince myself that it reeeally wasn’t that noticeable.  I actually tried to sell it, at a significant discount, but I couldn’t sell it without pointing out the flaw—and big surprise, no one wanted to buy it then!

So what’s a girl to do??  Well, I ignored it until a few weeks after Christmas.  We actually had people sitting at it for Christmas dinner, and we built a puzzle on it…and it continued to drive me crazy.

So my nice big table got shrunk!  I took it back outside and disassembled it.  I removed the offending breadboard ends completely, and then I cut down the aprons on the long sides of the table by about 9”.

furniture 011

I was left with a petite farmhouse table!

furniture 016

It sold more easily this time, because I didn’t feel I had to apologize for it!

furniture 013

Oh, and did you notice my cute little bentwood bistro chairs?  I picked them up at Ruffles & Rust a few weeks ago.  I think they’re keepers! 

Now I just have to build a table to go with them!  Winking smile

Monday, October 28, 2013

Grand Truss Table & Benches

This could be the one.

Really.

The number of tables that have come and gone in my dining room since the beginning of the year has become a little bit of a joke.

I think this makes seven.

table 7 042

And the funny part is…this one won’t be staying either!

I built this as a custom order for a woman I met at the October Market, but I’m not sure I want to let it go!

table 7 044

This thing is huge—8 feet long!  (That’s why it’s “Grand.”)

table 7 047

The benches are 80” each, and it easily seats 10 people with chairs at the ends—you could squeeze 12 in if they’re friendly!  The benches are an adaptation of Ana White’s Providence bench

table 7 056

The table…well, it was a bit of an adventure.  I started out looking at the Providence Table plans, but I knew I wanted a chunkier base…and the plan page directed me to Design Confidential plans.  Unfortunately, the plans from Design Confidential are not as well-written as Ana’s plans, plus some of the measurements are just plain…wrong.  I had to do a little “winging” of things as I went along.

After my table was done, I found that Ana White does have her own 4x4 truss table plans here.  Oh, how I wish I had realized that at the beginning; it would have saved me a grand headache!  But I guess I can say that mine is an “original!” 

table 7 045

The other big change for this table is the color.  I have been playing with light, old, weathered looks for all the others, and I loved them….

table 7 046

….but I think my heart really lies with dark.  My customer wanted a very dark Pottery Barn-esque finish, I think I achieved it, with FOUR coats of Minwax Antique Walnut, mixed with a little ebony here and there (not a separate coat) for depth of color.  The staining and finishing took FOR.EV.ER, but it was totally worth it in the end.

table 7 049

You can also get a glimpse of exposed hardware on this table.  Rather than use pocket holes (which is problematic on 4x4 lumber anyway), I used 5-inch lag screws to attach the beams together.  It just adds to the rustic quality, I think.

table 7 048

The only way I can reconcile myself to giving up this table is knowing that I can build another one…for me!  Plus, 8-feet is really too big for my dining room, darn it.

I’ll just enjoy looking at it until it goes to its new home!

**********************

Linking up here:

The Inspiration Exchange Elizabeth & Co.
Primitive & Proper Thrifty Décor Chick
Friday Remodelaholic The Scoop!
Funky Junk’s Saturday Night Special The DIY Show Off
Miss Mustard Seed
Beyond the Picket Fence Coastal Charm
Knick of Time
Domestically Speaking
Perfectly Imperfect No Minimalist Here
Common Ground My Repurposed Life
From My Front Porch to Yours Mod Vintage Life
A Little Knick Knack

Monday, October 21, 2013

Modified Breadboard Farm Table

My dining room is empty again.

I built another farmhouse-style table before the Barn Sale in August, but it didn’t sell there, nor at the October Market.  That didn’t bother me at all, as it looked very nice in my dining room!

Red Hen Home Table 6 007

I made this one a little smaller than usual; it was just 72 inches long rather than 78 inches.  But it would still seat eight, thanks to the narrow pressed-back chairs I found and painted black to go with it.

Red Hen Home pressed back chairs

The other side got a bench (modified from Ana White).  I originally painted the bench a soft dill green, but I didn’t care for it much…so I painted black over the green, but used the Vaseline trick to give it a very chippy finish.

Red Hen Home Table 6 004

I call this table top a “modified breadboard.”  Breadboard ends extend across the whole width of a top, but in this case I only made them for the middle three boards of the table.  So the long side boards are the entire length of the table.

the Barn 030

It just gives it a little different look, which I like.

I also played with a little white wash on this table.  It makes it look a little gray-er, in my opinion, and adds to the look of age.

the Barn 027

This may sound silly…but I’m excited that it’s gone, because now I get to build another one  Winking smile  I am actually working on a HUGE custom table for someone right now, and it’s nice that I’ll have the space to photograph it before it goes to its new home!  But then…I get to figure out what to do next…for ME…

Red Hen Home Table 6 006

…at least for a little while!

**********************

Linking up here:

The Inspiration Exchange Elizabeth & Co.
Primitive & Proper Thrifty Décor Chick
Friday Remodelaholic The Scoop!
Funky Junk’s Saturday Night Special The DIY Show Off
Miss Mustard Seed
Beyond the Picket Fence Coastal Charm
Knick of Time
Domestically Speaking
Perfectly Imperfect No Minimalist Here
Common Ground My Repurposed Life
From My Front Porch to Yours Mod Vintage Life
A Little Knick Knack

Monday, July 8, 2013

The Other Solomon Table & a Bench

After my table-building frenzy this spring, I’ve been in a bit of a dry spell.  Too many other projects going on, although I have a couple more tables in my head that are dying to come out!

Last week, though, I built a bookcase for one of the couples who bought a table from me, and I realized I never showed off their table, so here it is!

Red Hen Home Solomon Table 11

This table is a slightly smaller version of the Solomon table I built for myself

You can see the details of the brackets I cut for each corner.

Red Hen Home Solomon Table 3

I love the look of my doily runner on the wood!

Red Hen Home Solomon Table 5

They wanted a bench for one side of their table, and we chose to do a modified version of Ana White’s Providence Bench

Red Hen Home Solomon Table 9Red Hen Home Solomon Table 12

This one has a top made out of 3/4” thick boards to match the table top.

They sent a picture of how it looks in their new home…I love that!

Red Hen Home Solomon Table 14

I’ll share their new bookcase in a couple of days!

*********************

Linking up here:

Domestically Speaking Elizabeth & Co.
Primitive & Proper Thrifty Décor Chick
Friday Remodelaholic Inspiration Exchange
My Simple Home Life’s Simple Creations Friday Miss Mustard Seed’s Furniture Feature Friday
Funky Junk’s Saturday Night Special The DIY Show Off
Beyond the Picket Fence Coastal Charm
Knick of Time
My Uncommon Slice of Suburbia
Perfectly Imperfect Sawdust Throwdown
Common Ground My Repurposed Life
From My Front Porch to Yours A Little Knick Knack
The Scoop!
No Minimalist Here