Saturday, November 13, 2010

Numbered bar stools


I found these two wood-and-metal barstools at Deseret Industries months ago. It's a well-established fact that I have a thing for barstools...which is silly, since I own exactly ONE, and it's not a work of art.

They were painted dark green from top to bottom, and it was darn near impossible to sand the paint off of the metal legs!


So I resorted to stripper...


Don't you love how the top gets all moldy looking??


I was in for a surprise when I started scraping paint.

For underneath the green, there was brown.
Underneath the brown, there was red.
Underneath the red...well, there was finally metal.

I sanded down to bare wood on the seats, but I never did completely get down to bare metal on those legs...even after multiple applications of stripper. But I did get down far enough (and smooth enough) to paint again.

So, after Rustoleum primer and black spray paint for the legs, and a little Minwax English Chestnut stain on the tops, here they are today:


I used my Cricut to cut cardstock stencils for the numbers. I squared the stencils up with the grain of the wood, but when I replaced the seats on the bases, I discovered that the grain wasn't squared up with the legs! That bothers me a little...but I am telling myself that for a "funky junk" style, it's OK.


Do I believe myself? That remains to be seen!


HookingupwithHoH
Funky Junk's Saturday Nite Special

Birthday Wedding cakes crafts parties


Furniture Feature Fridays

<

MuralMaker and More

Tuesday, November 9, 2010

What I got !

I promised to show off what I got in exchange for my Divine Dining Table. I couldn't be happier!

Ta-da!


Isn't she pretty??

I used to have this little table in that spot:

It was fine, but I have since decided that I prefer color in my accessories rather than my furniture.

This new-to-me little desk has history! character! It has a slide-out writing surface!


Perfect for a lap-top!

My grandparents' trunk still fits neatly underneath.

I love the top folded back, but it can also close if wanted.


Actually, that part is a little tricky, as the original hinges are broken. I'm on a hunt for new ones, but I haven't had any luck yet.

Other than that, this little desk was in remarkably good shape. There were/are definitely some dings and scratches:

...but I used a little Walnut "Restore-a-Finish" on it, and while it isn't a magical ointment, it does do a pretty good job of hiding minor defects.

Here's one last pretty picture:


I'm so glad it's mine!


HookingupwithHoH

Furniture Feature Fridays

Friday, November 5, 2010

It's Di~Vine!

If you live in the Ogden/Salt Lake City area, you really should stop by Di-Vine Consignment(4510 S. 900 W.) this week for their Grand Opening Celebration! They will be having prize drawings today and tomorrow.

I became friends with the owner through some mutually beneficial transactions. She bought this cute headboard from me:

as well as this cedar chest:


and I purchased this bench from her (it was originally yellow; I repainted it).

Recently she let me into her "workroom" where she literally has stacks of furniture waiting to be redone/refurbished/updated/glorified (whatever)! She has her work cut out for MONTHS, if not years! She commissioned me to finish a dining set for her so she could sell it in her shop.

There are six chairs; one is an arm chair:


And look at these gorgeous table legs!


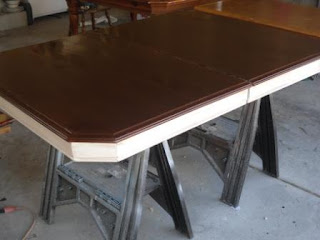
My first step was to sand down the table top...

...and that's where the trouble started. The veneer was loose and dry in several places along the edge, and the sander ripped some pieces right off. Argghh! The plan had been to stain the top, but missing veneer poses a problem.

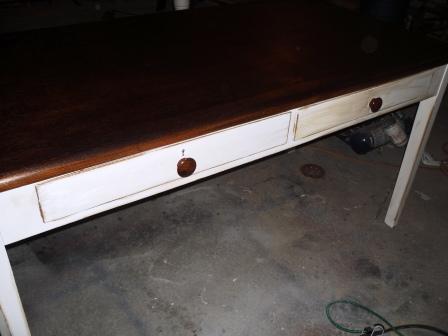
I wondered, though, how bad could it be? So I filled in the missing places with wood filler, and stained it anyway. Yeah, not so good. Although wood filler is "stainable," in a large area you really miss seeing that pretty wood grain!

Strike 1.

Then I thought about "faux painting" the wood-filled area to simulate wood grain. I broke out my paintbrushes and acrylic paints, and gave it a go. Hmmm...it didn't seem too bad... Stain it again. Color's good, but the texture--still bad.

Strike 2.

Forget about stain. Let's just paint the whole top, and then see what glaze can do. Hmm. Not bad, but kind of bleahh.

Strike 3.

This is getting ridiculous! And yes, in baseball I would be "out." Thankfully it doesn't work that way with furniture. ;-)

In sheer desperation, I pulled out my leftover can of MinWax Polyshades in Antique Walnut. I had tried it on another project, and I was less than impressed. This time, I was hoping the maybe the color in the polyurethane would give an extra depth of color to the plain brown painted top.

Whaddya know...it worked!


{huge sigh of relief}

Magically, blessedly, it worked. The color was lovely; it glowed. I had to take back all the nasty things I said about Polyshades in the past.

As you can see, the apron of the table and the chairs were painted in Rustoleum's Heirloom White. I glazed everything with burnt umber craft paint afterward. Here are the pretty leg supports. They were a late arrival; they had been misplaced and weren't with the rest of the set!


Look at the beautifully detailed table legs!


Here's the pretty arm chair:


The owner was going to cover the seats herself. See the pretty fabric on the top of the table? It's brown with a turquoise and ivory pattern. However, as people have come to look at the set in the shop, not everyone has been impressed with her choice! So for now, she's going to leave the seats uncovered and offer the buyer their choice of fabric for the seats.


Here's a last pretty picture!


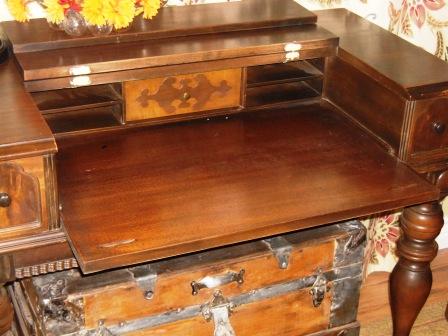
And coming soon...wait until you see what I got in exchange! (Hint: it wasn't money!)

Furniture Feature Fridays
Funky Junk's Saturday Nite Special

The DIY Show Off

Thursday, November 4, 2010

Ughh. I need help!

Remember the two free chairs I got back in August? Here's what they looked like:


They finally made it to the top of the queue, mostly because I am trying to get my garage cleaned out before the snow flies!

I made my two oldest children help me pull out 4,193 staples Saturday afternoon. That left me with this:


I wasn't feelin' the love for the medium oak stain, so I sanded the arms and legs down, and tried to darken them with Minwax Walnut stain.

I got this:


So
not impressed. The grooves were really hard to sand out, which probably explains why the stain didn't take evenly...or well. It just looked muddy to me.

So I broke out the Heirloom White spray paint, and the burnt umber craft paint for a glaze. It wasn't great, but I was hoping it would look better with actual fabric on it.

After several hours spent re-upholstering today, this is what I have (keep in mind that there is no trim yet):


Guess what? I'm still not impressed.

What do I do now? I really don't see this in black, but maybe I should paint the legs brown? I've never been crazy about brown-painted wood, but it's gotta be better than what I've got now! Any other suggestions? Anyone? Anyone?


HookingupwithHoH

Monday, November 1, 2010

Library Table

Yes, it's true...I cheated on my furniture diet yet again. I was browsing through Deseret Industries (Utah's own "Goodwill") last week, and I happened upon THIS:

Seriously, what's a girl to do?? I love the look of old library tables...it had to come home with me.

One of the drawers even has a lock! There is no key, but...it's CUTE!


A year ago, when we got rid of my husband's monstrosity of a desk, I looked everywhere for one of these...not luck. Eventually he bought a used IKEA Gallant desk for our basement family room. I cherished the hope that once this one was refinished, he would let me swap his IKEA desk for this one.

No such luck!!
**That man does not understand the concept of "furniture fate"!**
(sob!)


I refinished this desk in my favorite Sherwin Williams Creamy white with a walnut-stained top. (That may have something to do with the fact that I am had half a gallon of paint on hand.)


I kept the original knobs, but stained them darker as well. It gives it more of a "furniture" kind of look, I think...less desk-ish.


I distressed the edges and then glazed the bottom with stain. I used it pretty heavily on the corners and edges where I did the most distressing.


I'm sorry these aren't very pretty pictures. It would not be an easy piece to move into the house!

Goodbye, dear desk...you will be missed!

What about you? Do you understand the concept of "furniture fate"??


HookingupwithHoH


A Little Knick Knack
Furniture Feature FridaysFunky Junk's Sat Nite Special