Friday, January 14, 2011

Bathroom Facelift Phase 1: The $5 Paint Job

The most-used bathroom in our house is probably the one on the main level. There are two nice bathrooms upstairs and one in the basement, but the convenient little half-bath is surely the most popular. And...it's the one any guests use.
Not exactly a recipe for success.

Several years ago I put up a nice textured wallpaper and a lighthouse border that I found at Lowe's. It wasn't expensive, and it was better than those plain white walls.


Like the way the kitchen dishtowel gets pressed into service as a hand towel? This is real life, folks!


Here's the big problem: every little kid who has sat on this toilet has been inexplicably drawn to the seam in the wallpaper.

Pick...Pick...Pick...

That section of the wallpaper has been put back together (like a jigsaw puzzle) on multiple occasions! (Thank you, Elmer's Glue.) After years of this, may I just say...

I am so over wallpaper.

So last weekend...I was bored.
What to do...what to do... I know!
Let's rip all the wallpaper out of the bathroom!

So I did.


The top vinyl-y layer comes off in big sheets, leaving behind the paper backing and the adhesive. If you're planning on removing wallpaper, your next two best friends are these:


A squirt bottle and a plastic scraper (I use the kind kitchen stores like to give away).

Once all the paper was gone, I washed down the walls with TSP to remove any glue residue. I've never done that before, but it seemed like a good idea at the time!

Now...the paint! I bought a $5 gallon of "oops" paint from Lowes, and base-coated the whole bathroom in a nice creamy white.

But it needed a little pizzazz! So after much measuring and leveling, I marked out the wall for STRIPES!!

I measured the wall from the ceiling to the top of the baseboards, and divided it into 7 stripes, each 11.5 inches wide.


I placed the tape on the outside of the stripes I would be painting. Then, using a trick I have learned from Blogland, I quickly ran a roller with my base color over the inside edge of the tape (the edge that was going to be the new color). This seals the edge of the tape, and any bleeding that happens isn't noticeable, because it's the same color as the base coat!

Genius, I tell you; sheer genius!

The color for my stripes was a mix. I tried using the same tan color I have in the rest of my house (Martha Stewart Woven Flax--love it), but it seemed too dark. So I mixed some of the Woven Flax with my $5 paint and came up with a softer tan. Perfect.

So, without further ado, here is my newly striped bathroom!

See? No more jigsaw puzzle next to the toilet!


Love the super-clean stripes. I had to do very little touching-up.


Not bad for a $5 paint job, don't you think?

Still to come: a frame for the mirror, new light fixture, painting the vanity (I think), and the frou-frou!


Funky Junk's Sat Nite Special

Photobucket

The DIY Show Off

Domestically Speaking


Visit thecsiproject.com

Thursday, January 13, 2011

Owlings

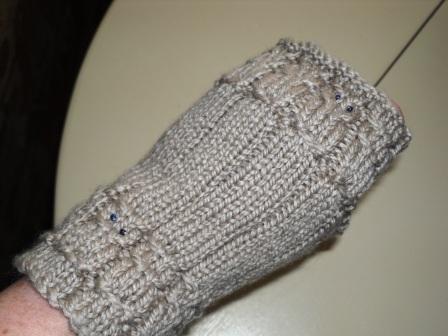
I am on a fingerless gloves kick! I found a great pattern on Ravelry, and it cried out to me to make it...

This is "Owlings." The rows of cables look like rows of little owls. I used seed beeds for eyes for one owl on each row. (Where are my fingers?? Curled up in there somewhere, I hope!)


Tied up in a ribbon, they made a fun "post-Christmas" gift for a good friend!


Someday I'll make some for myself!

I am RedHen6 on Ravelry, if you're interested in seeing some of my other projects.


Photobucket


Funky Junk's Sat Nite Special

Photobucket

Friday, January 7, 2011

The cabinet at the top of the stairs

Really.

That's what we call it.

Maybe it doesn't have quite the ring that

"the cupboard under the stairs"

has, but it's gotta be close!


Anyway, I bought this little cabinet from a classified ad for $50 several years ago. In my head it was going to sit just inside our front door, but it was too big. Instead, it went to the landing at the top of the stairs, and there it has sat ever since!


And it was fine for a long time. It holds all my yarn stash, and other miscellany crafty items. It was a brown cabinet on a white wall, and it wasn't bothering anybody.

Then I had to go and paint the wall...a year ago. Now it was an ugly brown cabinet on a brown wall, and it bothered ME...a lot!!


If it bothered me so much, you might wonder why it took a year to paint it. Well, there were too many more-fun-more-interesting projects waiting in the garage. Then there was homeschool. Then there were the holidays.

But all that is OVER now....and the time had come.

Wednesday I bought paint and a dropcloth (which I used as a dropcloth) and got to work!


The poor little cabinet never moved from the top of the stairs. I just pulled it away from the wall and left the doors and drawers hanging open for a few days. It's OK. No one fell down the stairs in the middle of the night... (that I know of--I wear earplugs at night!)

I used Behr Premium paint in "Heavy Cream." In retrospect, and I needed something a little more creamy, but that's how the milk spilt! I used Minwax Dark Walnut stain to glaze it all over, and I replaced the hardware (except the hinges, although I would have if I could have gotten them off).

It definitely "pops" more against the brown wall now, and that's good.


The bad is that it isn't exactly the same "white" as the framed pictures above it.

And the pictures aren't going / can't go anywhere!

(These are my treasured hand-painted irises on porcelain tiles that my mother made. They are beyond gorgeous, but the frames may have to be re-re-painted to match the cabinet now!)


The color difference was really bothering me until I put a few doo-dads on the cabinet. That helps fool my eye into not noticing the difference quite so much!


I will admit this isn't my ideal piece of furniture for this spot--what I really want is an antique dresser that's up on legs. But I can live with it a while longer now!

What do you think? Better?


Furniture Feature Fridays

Funky Junk's Sat Nite Special


Photobucket

The DIY Show Off


Domestically Speaking

Photobucket

Friday, December 31, 2010

Pajama Pants

It's all about balance.

As the mother of six children (three boys & three girls; how cool is that!), Christmas can be a tremendous balancing act! Sometimes I balance across all six children, and sometimes I just have to make sure the boys balance (or just the girls).

Enter a pair of pajama pants.

Really, I promise it will all make sense.

You see, I knitted a dragon scarf for one boy. And a handmade gift for one boy means the other two need something handmade...and Christmas was drawing ever closer! I finished a pair of fingerless gloves (see my boys' gifts here). Then I was out of time!!

In a desperate search for something to make up the difference, I came across some delightful "Toy Story" flannel, and a pair of pajama pants was born!

Boy #3 looks happy, don't you think??


And look....he balances!!


Photobucket

Funky Junk's Sat Nite Special

Photobucket


HookingupwithHoH

Monday, December 27, 2010

Featured!


My cedar chest (one of them, anyway) has been featured on Remodelaholic!

See it here!