Showing posts with label office. Show all posts

Friday, March 15, 2013

Office Progress: The Desk!

I am being so good!  I am posting another office update in less than three weeks’ time!

When last I left you, this is what we were living with in our “office”…

2013 projects 030

…and we lived with it for a few weeks, waiting for our desk to be completed.

And for a reminder, this was the inspiration photo for our desk:

Houzz Real Life Offices

Oh, it was a happy day when the first pieces arrived!  Due to some scratched paint, it took a while for everything to be delivered.  This piece is the right-side base cabinet.  You can see the decorative venting material on the left side that lets our computer breathe.

2013-03-01 12.43.58

Next a beautiful 6-foot maple desk top was installed…

Red Hen Home desk collage 1

We used a temporary cleat to hold the bridge up…

Red Hen Home desk 4

That was my idea, and I’m very proud of it  Winking smile

Red Hen Home desk 3

It’s coming together!

Red Hen Home office2

Ta-da!

Oh, it’s so pretty.  Even with wires and all (it took another day or so to drill the cord grommets we needed in the desk top).

I love how the bridge is slightly shallower than the shelves on either side.  It gives an interesting depth, but it was murder to cut the crown molding!  Glad I wasn’t the one doing it!

And I stood back and looked at the blue…the yellow…the white….

…and I didn’t like it.

Originally the back of the bookshelves was supposed to be the same light blue as is on the walls, but I chickened out after living with the light blue for a few weeks, and had them painted all white.  I just wasn’t feelin’ the love.

My younger sister was over the night after it was installed, and I made her help me “decorate” the shelves for a couple of hours a little while to see if I would like it better….

Red Hen Home office 1

…and it helped, but not enough.  (No, I didn’t want to drive a nail in my newly painted wall…we were “just playing” with a few things.) 

I finally decided:  something about the blue, the yellow, and the white…reminded me of a baby’s room.

 Not the look I was hoping for.

What’s a girl to do??

***

***

***

***

***

Nothing a little MORE paint can’t fix!

Red Hen Home office navy

Ahh…much better!

Red Hen Home desk 5

…to be continued…

(please forgive the cell phone pictures!  I’ll do better…later)

***************

Desk unit built by Wilson’s Custom Carpentry, serving the Seattle area.

Wednesday, March 13, 2013

Office Progress: Paint, Trim, and Light!

It’s been a very long time since I’ve updated you on the office project (you can see the previous posts here and here).

In case you need a reminder, here’s what I started with:

office 002-001

Ugh.

I chose a palette of colors…

Red Hen Home office palette

…and settled on a trim height for some board and batten…

Red Hen Home office moldings 5 

…and away I went!

The first thing to do was to paint the beige ceiling SW Creamy.  Then the top two-thirds (or so) of the wall got painted SW Bee’s Wax, and the bottom was painted SW Dover White.  Why Dover White?  Because that’s the trim color used all through the house, and the previous owners left gallons of it behind! 

2013 projects 003

That big patch on the far wall is what color the whole room used to be—ceiling and all.  I like the color fine, I am just in the mood for something brighter here in gray Seattle!  This yellow is actually a bit of a leap for me, but my daughter talked me in to it.

2013 projects 004

Next I put up a 3-inch MDF chair rail, topped by a 2-inch piece of MDF that sticks out horizontally from the wall, creating a nice little ledge.

2013 projects 006

I was ridiculously proud of myself for figuring out the angles on this funny little wall!

2013 projects 009

Next I glued a piece of cove base over the seam to finish it off.   I didn’t use glue on any of the other trim work, as I didn’t want to wreck the walls if I ever want to remove the board-and-batten.  But this cove base is too fragile for brads, so it was Liquid Nails (and painter’s tape) to the rescue!

I was annoyed that the battens protruded farther from the wall than the baseboards did.  I didn’t think it would bother me…but it did.

2013 projects 011

My solution was to sand down the sharp edge into a more gradual curve.  After caulking and painting it, I don’t notice it anymore.

I also hired an electrician to come install a light box in this room.  It was set up so a light switch controlled the top outlets in the room, but I was craving LIGHT!  Have I mentioned it’s kind of dark here??

2013 projects 013

Yes, I took a picture of the hole…it made me very happy!

2013 projects 016

The fixture I put up myself—that saved me about $40.  It is just an inexpensive light I ordered through Amazon.  I really wanted the cool orb light from Ballard Designs, but it wasn’t in the budget!

2013 projects 014e

I have two holes in the ceiling that were necessary to run the wiring for the new light.  It’s been about a month, and I still haven’t patched them!  If you come into my office…please don’t look up!

2013 projects 025

But isn’t the new molding pretty??

Is anyone wondering what happened to the blue portion of the color palette?  Well, I had great plans for it.  It was supposed to be an accent color behind the under-construction desk, and I got this far with it…

2013 projects 005

The tan will be hidden by the desk. 

Oooh…I’m not really sure I’m crazy about this.  I’m going to be patient, though, and reserve judgment until I see it with the desk…

        2013 projects 030

So…lots of progress, but still room for improvement! 

2013 projects 030

Wednesday, February 13, 2013

Office: Making Decisions

Some decision were easy, some were hard.

The decision to add a board-and-batten treatment?

Easy!

The decision of how high to hang it?

Not so easy.

And it involved a LOT of masking tape!

High or low

I snapped a million pictures with my phone and sent them off to my Utah friends for their opinions.  I don’t have in Washington friends to drag into my decision-making process yet!

Mid-wall was ruled out really quick.  I had a real soft spot for the high molding, but my daughter didn’t like it—plus it complicated the whole “picture hanging” scenario, so we went with the traditional “low.”

Then there was the whole thin vs. fat issue…

Fat or thin   

That one was easier.

I like it fat.

Nevermind that I had to take all the thin molding back that I’d already purchased!

Deciding on a palette…that took forever!

Red Hen Home office palette

I went a little bolder and brighter than is my norm, and probably that’s because I am a little tired of the dark and the gray here in my new home!

Decisions made, now on to the painting!

office ceiling

Wednesday, November 28, 2012

Come to the Dark Side: Card Catalog

I’m tired of talking about moving.  I’m tired of thinking about moving.

So here’s a little project I finished in the pre-moving days.  It always makes me think of this T-shirt quote:

I bought a card catalog last summer (that’s 2011…not 2012).  It only took me a year to do something with it!  Far too often I get involved in projects that don’t ever stay in my home…but this was an exception!  I knew I wanted to keep this one.

Red Hen Home card catalog before
When I saw the classified ad, I couldn’t send my sister after it fast enough (I’m good that way).

I love it, but I wasn’t crazy about the bland medium-oak finish.
This spring I discovered a MIRACLE product:  General Finishes Gel Stain.  With it, you can darken an existing wood stain without completely removing the original finish—you just have to scuff it up a little.  (See this post for a more complete description of how to use it.)

I chose to use the stain in Antique Walnut for this project, and this is what I ended up with!
Red Hen Home card catalog 1

I used three coats of stain, wiped on with a sock, and let each coat dry for about 24 hours in between.


Red Hen Home card catalog 2

I love the new color, and the fact that there are some variations of light and dark shades.  Some might call that user error, but I prefer to think of it as character!


Red Hen Home card catalog 3

I love the pull-out trays on this piece!


Red Hen Home card catalog 4

The card catalog sits in our front-room-home-office, and I see it and smile every day now.  And I think to myself “Come to the dark side…”

But who hid the cookies??


Red Hen Home Office

You can see my other office projects here:

*****************************
 
Linking up here:
Domestically Speaking Elizabeth & Co.
Primitive & Proper Thrifty Décor Chick
Friday Remodelaholic 2805
My Simple Home Life’s Simple Creations Friday Miss Mustard Seed’s Furniture Feature Friday
Funky Junk’s Saturday Night Special The DIY Show Off
Stone Gable
Beyond the Picket Fence Someday Crafts
Knick of Time
Mod Vintage Life
My Uncommon Slice of Suburbia
Perfectly Imperfect {Primp}
Common Ground My Repurposed Life
From My Front Porch to Yours All Star Block Party
A Little Knick Knack
Cowgirl Up!
Thrifty Décor Chick
{aka} design
Coastal Charm

Monday, May 21, 2012

Office Project: The desk!

desk 029

I have no excuses.

It has taken me forever (well, at least a week) to blog about the desk—and for no good reason, other than that it has taken me that long to take and edit a few pictures.  But the time has come…

You can see my concept drawing for the desk here, and the technical drawings here.

It took me two trips to pick up all the pieces of the desk from the talented craftsmen at Sean’s Woodworking in Salt Lake City.   Have I mentioned that it’s NINE FEET wide??  Go big or go home, I say!

They would have been happy to bring it to me and install it for me—but that version is for people who have more money than time (that’s not me).  But never having installed cabinets before, I really didn’t know what I was up against!  So here’s a quick re-cap, if you’re interested.

Because I was going to be installing things myself, they built the upper cabinets with a cleat system, so they could be briefly hung on the wall on a 2x4 until I could screw the cabinets themselves into the wall.  This was a very good thing.  Otherwise, it would have taken a fair amount of juggling and weight-lifting to get everything up and level!

I carefully marked my studs, and first screwed the cleat for the bridge unit into them.  Then I discovered that the cleats for the bookshelves on either end did NOT transverse two studs!  That was not a happy moment, and that’s why the cleat is crooked in the picture!  I ended up using drywall anchors to secure one end of the cleat.

front room to office 002

I prevailed on a neighbor to come help my husband and I lift the bridge unit up onto the cleat—it was heavy!  Then I screwed it into the wall.   The side pieces we could handle on our own!

I posted this “sneak peek” on Facebook the day we were installing it!

front room to office 005

I ran into a few snags on the installation.  This desk is meant to be used for a computer, and so we needed holes for cables/cords to pass through.  When I picked the desk up, I was supposed to have them drilled—but we all forgot.  They assured me I could do it myself, but it was really NOT an easy project.

For example, drilling though the desk top involved drilling through TWO 3/4” pieces of wood, plus a 3/4” piece of MDF!  It took a good 20 minutes to get through all that.

front room to office 009

…but at least I learned that the desk was sturdy!  Yep, I climbed on top of it.  And really—it was easier to do that part than the two holes that had to be drilled in the sides of the cabinets below!

front room to office 013

But drilling the holes was only part of the solution—you see, there are DRAWERS under the counter top, and thus there was no where for the cords to go.

front room to office 006

My solution was to knock off the back of one of the drawers, cut the drawer bottom down my 3 inches, and reattach the back of the drawer.  It was a little hard on the MDF…

front room to office 008

…and trust me, it was emotionally difficult to break part of a brand-new and expensive desk!

Next problem was due to a bit of a miscommunication, I think.  I requested a pull-out shelf in the right-side cabinet for my printer.  They built me a drawer inside the cabinet:

front room to office 016

The difference was that my printer wouldn’t fit in the drawer!  So I took it out to my table saw and sliced off the top three inches all around—thus creating my own shelf.

front room to office 017

Not so pretty, maybe, but it worked!

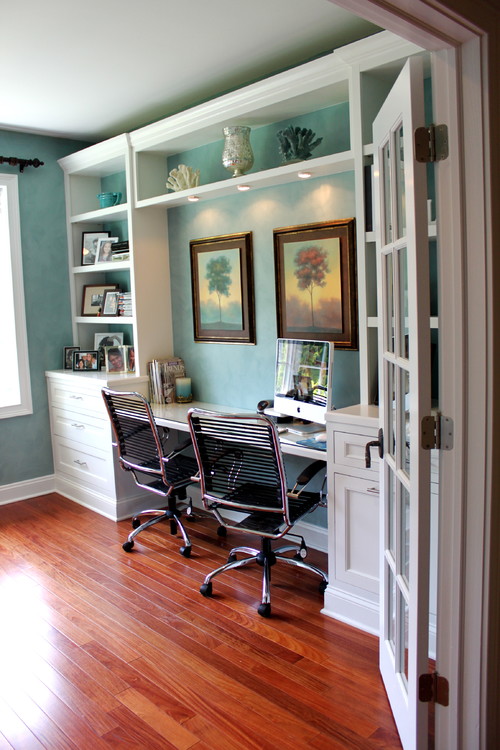
So here’s a brief tour of my favorite features:

** My printer is tucked away, with space for paper as well!

desk 022

** The CPU is also tucked away, but in a prettily vented cabinet (I got the idea to use decorative sheet metal from Meridian Road).

desk 024

** I love the upper bridge.  I gave up on seeded glass (it was expensive).  The cabinets look like they open upward, but that’s only because of where the pulls are installed.  Upper hinges are VERY expensive, so this was a great cheat!

desk 027

**  I love the corbels under the bookcases, but I will admit that they are not as eye-catching as I hoped they would be.  But I love them because Sheri from Sean’s Woodworking let me come to the shop and help paint and distress them (more on that another time).

desk 025

So there you have it!  It is, without a doubt, the “most major” part of the whole “front-room-to-office” project.  There are still more things to be done in the room—a couple of furniture pieces to finish, and I’d like a rug—but we’re actually using that poor unloved front room now!

desk 020

And I am happy to say that I actually like having the computer there.  It’s easier to keep track of what the children are doing, more convenient for me to use, and best of all…

desk 028

…it’s pretty!

******************************

P.S.  The Map Wall may be found here.

************************

This project has been featured at My Repurposed Life and Primitive & Proper.

***************************

Linking up here:
  Elizabeth & Co.
Sisters of the Wild West No Minimalist Here’s Open House Thursday
Friday Remodelaholic 2805
My Simple Home Life’s Simple Creations Friday Miss Mustard Seed’s Furniture Feature Friday
Funky Junk’s Saturday Night Special The DIY Show Off
Primitive & Proper Thrifty Décor Chick
  My Uncommon Slice of Suburbia
Perfectly Imperfect {Primp}
Simply Klassic Sundays My Repurposed Life
From My Front Porch to Yours It’s So Very Cheri
Cowgirl Up! {aka} design