Today Red Hen Home welcomes it’s first EVER guest poster! Amanda from the Ivy Cottage was the inspiration behind my Bedroom Bling nightstands,
and my beadboard pennant banner debuted on her lovely blog!
We both hope you’ll enjoy her fun Christmas project!
*****************************************
Happy Holidays, Red Hen Home Readers!
My name is Amanda and I journal over at

The Ivy Cottage Blog!
My blog is filled with ideas, inspiration, DIY, tutorials, and fun. Stop by and check out some of my latest projects! Now, on to my post . . .
My mother-in-law inherited some BEAUTIFUL antique sleigh bells a few years ago. Every Christmas when she gets them out and drapes them across her mantel, it takes everything I have not to snatch them and run away yelling mine, mine, mine!
My name is Amanda and I journal over at

The Ivy Cottage Blog!
My blog is filled with ideas, inspiration, DIY, tutorials, and fun. Stop by and check out some of my latest projects! Now, on to my post . . .
My mother-in-law inherited some BEAUTIFUL antique sleigh bells a few years ago. Every Christmas when she gets them out and drapes them across her mantel, it takes everything I have not to snatch them and run away yelling mine, mine, mine!
LOL, well, I do love those sleigh bells, but I cannot afford to buy some of my own. Here is my little knock off tutorial for Vintage Sleigh Bells!
Materials:
* Old leather belt
* Acrylic paint and brush
* Towel
* Jingle bells
* Measuring tape
* Awl & hammer
* Wire
I found this leather belt at the Salvation Army for $6. I chose it because the leather was cracked and it had a worn look. Unfortunately, the color was a little bit too yellow.
To cut down the yellow tone in the belt, I used the above acrylic paints to break down the color.
I started by painting a small section of the belt with the dark paint.
Then I used the towel to rub the paint into the cracks and remove the excess.
Afterwards, I went back with the copper paint and rubbed it on for a few accents.
Next, I measured out every 2 1/4 inches with the measuring tape and marked it was a sharpie.
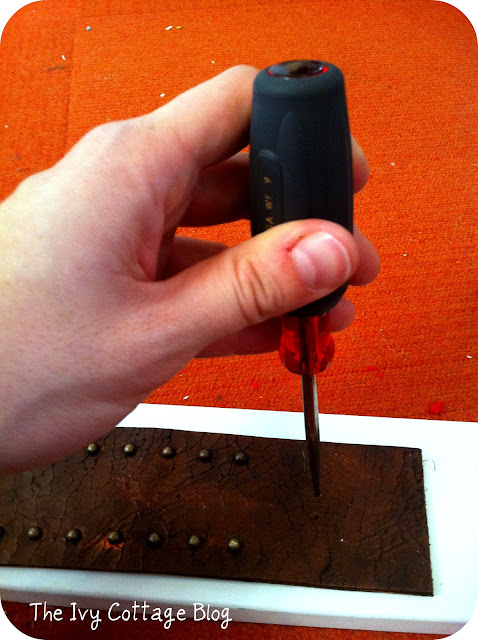
To make the holes in the leather, I used an awl and hammer.
Make two holes side by side.
Be sure to put a piece of scrap wood underneath the belt when you are making the holes.
These are the jingle bells that I used from Hobby Lobby.
Cut a piece of wire about 4 inches long and loop it through the jingle bell.
Put the ends of the wire through the holes . . .
Then twist and secure them on the back. Repeat this until you have attached each of the jingle bells. I also ended up putting a piece of gorilla tape over the wire on the back to make sure that it does not scratch any surfaces that it sits on.
Thanks so much for sticking around til the end of my post! Be sure to pop on over to The Ivy Cottage Blog and check out some of my other Holiday projects here.


9 comments:
Oh, Oh, Oh, I want that. I have been wanting old sleigh bells for sooooo long... have you priced those things. I would have never thought to make one.
This is gorgeous and that old belt is perfect. Thanks so much for sharing this. I know what my next project is going to be.
Hugs, Deb
That is cool! I've been wanting some sleigh bells myself but the price! Thank you for this tutorial.
Very vintage. I want them to be mine, mine, mine.
Those are adorable!
You are a genius! What a darling idea! I'm saving this one for sure! :)
xoxo laurie
That is such a good idea! I love how you used and old belt. It give the whole project such an authentic look.
You certainly found the perfect belt for that project!! It looks awesome!!
What a cute idea!
I totally love this and want some for myself, even though I don't have the slightest idea where I'd use them--sigh--the plight of a crafter! Pinning nonetheless.
Post a Comment