Showing posts with label chalkboard. Show all posts

Sunday, June 16, 2013

The Handbuilt Bedroom, pt. 5: The Chalkboard

I’m back to post another entry in “The Handbuilt Bedroom” series (you can see the last part here).  With a dresser and a bed, my son was ready for something “fun” for his room…and he wanted a chalkboard.

A big one.

Jacob dresser 007

My son’s room is a little awkward, in that there is very little wall space.  There is a window on one wall, with about 3 feet on either side.  Then there are two blank walls, but the fourth wall has a closet and two other doors that fill most every inch.  With the bed on one wall, that left us with about 10 feet of wall on the opposite side of the room.

Initially he wanted the chalkboard to run the full length of the wall.  However, I didn’t just want to use chalkboard paint on the wall because of the orange-peel texture, so I opted to buy a piece of hardboard to get a smoother finish.  I couldn’t figure out how to “seam” the hardboard and still make it look good, so the poor boy had to be satisfied with a chalkboard that is 8 ft long and 3 1/2 feet tall!

bench chalkboard 017

You can see how I marked the studs on pieces of painter’s tape, and then I used small brads to nail the hardboard directly into the wall.

Then I had to trim it.  Since boards come in 8-foot lengths, and my chalkboard was 8-feet long, I couldn’t do nice mitered corners.  Instead I used 1x3 boards along the edges and cut down some 1x4 boards to make some nice corner blocks.  Everything was painted red and glazed with black stain to match the chest of drawers.

Jacob dresser 010

Of course, the most fun thing to do was to “decorate” it for him before he got home!

Jacob dresser 009

“Cubby” (that’s my boy’s nickname, much to his chagrin") loves his chalkboard! 

AND his mommy!

 Winking smile

Jacob dresser 008


*******************************

Linking up here:

Domestically Speaking Elizabeth & Co.
Primitive & Proper Thrifty Décor Chick
Friday Remodelaholic  
My Simple Home Life’s Simple Creations Friday Miss Mustard Seed’s Furniture Feature Friday
Funky Junk’s Saturday Night Special The DIY Show Off
Beyond the Picket Fence Coastal Charm
Knick of Time
Mod Vintage Life
My Uncommon Slice of Suburbia
Perfectly Imperfect Sawdust Throwdown
Common Ground My Repurposed Life
From My Front Porch to Yours All Star Block Party
A Little Knick Knack
The Scoop!
 

Thursday, February 14, 2013

Happy Valentine’s Day!

Today I’m sharing a couple of my Pinterest-inspired Valentine decorations.  I don’t think I ever felt the need to even decorate for Valentine’s Day in the pre-Pinterest era, but all that has changed now!

2013 Valentine bunting

Valentine bunting inspired by this pin.

2013 Valentines

And I dressed up my chalkboard, inspired by this pin

Tonight the Rooster is taking me to dinner…he made reservations at a restaurant with no prodding from me!  There may be hope for him yet  ;-)

Hope your Valentine’s Day is a wonderful one!

Tuesday, January 17, 2012

Love Makes the World Go Round

I just barely got around to showing my post-Christmas buffet, but now it’s been changed up for Valentine’s Day!
The jumping-off point for me was when I found an out-of-date globe at the thrift store. I painted it with chalkboard spray paint, and wrote “Love makes the world go round” on it. I wish I was one of those people who had beautiful handwriting (especially on a chalkboard)—but alas, it is not one of my gifts!
I covered five balls with strips of maps cut out of an old atlas I found at a garage sale. They make interesting little globes, as long as you don’t expect them to be geographically accurate!
Valentine's 153
Using my Silhouette, I cut out a bunch of hearts from the same old atlas, and sewed them together to make a banner.
Valentine's 166
Valentine's 155
Other map hearts were sewn together in pairs, then folded to make a 3D “ornament” for my twigs leftover from the funky twiggy garland I made for Christmas.
Valentine's 162
My other globe got to join the display, with a few more map spheres.
Valentine's 160
I tried to go along with the ‘theme” by writing, “The best place to be is wherever YOU are” for my family. Quite frankly, I don’t think they ‘got’ it!
Valentine's 157
So I have to ask…do you ‘get’ the theme?
Maybe it only makes sense in MY head!
Happy Valentine’s Day!
Valentine's 159
******************************************
Linking up here:
Visit thecsiproject.com
Coastal Charm’s Nifty Thrifty Tuesday It’s So Very Cheri
Common Ground My Repurposed Life
Hookin’ Up with House of Hepworths {Primp}
Elizabeth & Co. 2805
My Simple Home Life’s Simple Creations Friday Miss Mustard Seed’s Furniture Feature Friday
Funky Junk’s Saturday Night Special DIY Show Off
Primitive & Proper A Simply Klassic Home
Beyond the Picket Fence’s Under $100 Party

Friday, June 10, 2011

Every great dream

"Every great dream begins with a dreamer."

That's what it says on my chalkboard right now.

I was smitten when Miss Mustard Seed posted this picture with her new pennant banner from Lisa Leonard designs.

(photo courtesy of Miss Mustard Seed)

Isn't it gorgeous? I love old metal and old wood. Unfortunately, the price for a "dream" banner is over $50, and thus out of my price range!

Luckily, I came across Vintage Skye's etsy shop!

She handcrafts the most amazing knobs, pulls, tags, and more out of clay! I wondered...could she make a pennant banner like the one I loved out of clay?

Oh yeah, baby!
(note: for about half the price of the metal banner)

Look what was waiting for me when I got home from Montana!


I am delighted with how it turned out. Each little 3" pennant has a lovely script imprint over the whole surface, and then the stamped letter is color in black. I love the texture each piece has.

Here it is on my chalkboard. Maybe it was just a little dream...but I was the dreamer!


I also got a few other treasures. I have four of these darling bird tags. One has a home on an old bottle on my buffet.


I also received four drawers knobs. They're waiting for just the right piece of furniture!

Thanks, Vintage Skye, for making my little dream come true.
This has not been a paid advertisement...I'm just...happy!

I'm also curious...what would YOU choose a banner to say??

Linking up here and.

Sunday, April 17, 2011

Spring Market, part 1

As I have mentioned before, I participated in my first ever "public showing" of my handiwork yesterday: the "Scraps of Simplicity Spring Market."

I was a real newbie at this whole boutique thing! I like to attend them, but I've never tried to sell at them! Thanks to wonderful, generous, unselfish friends, I was able to pull it off. Here are some pictures of my booth!

Recognize my 38 Flowers Dresser?


And there were lots of painted signs and trays.

And chalkboards...mostly HUGE ones!

This little toy box was a favorite of mine. It was blue when I bought it, and I tried painting it red, but that wasn't "it." In the middle of the night (seriously!), I suddenly knew it was meant to be yellow and say "You are my sunshine." I love that it turned out like the picture in my head!


This little black cedar chest was the first thing sold, I think--
to the people who had the booth next to me!


If you look closely at the next two armchairs, you might recognize them from long ago in this post. I painted the legs brown shortly after that, and liked them much better. They've sat in my front room for months, but without any trimming! I finally got around to trimming them within the last week, and I took them to Market. Lots of people seemed to like them, but they didn't sell--that's OK, though, at least they're finally finished for ME!


See the little pillow on the chair? It was my first attempt at spray-painted fabric (a drop-cloth to be exact). Next time I need to let the paint dry more before I assemble the pillow!

I love the cute headboard behind the chairs.


More to come...but what do you think so far?


Photobucket


topsy turvy tuesdays


Savvy Southern Style

Catch As Catch Can


Saturday, October 9, 2010

Subtle Craftiness

My husband just came upstairs and asked me if I was done with my "subtle craftiness" for the evening...I said yes, but of course I still had to blog about it!

I really threw him for a loop yesterday when I admitted a willingness--after almost 16 years--to do a little Halloween-type decorating! I have been so impressed by what I've seen around the Internet on my favorite blogs, of decorating that was classy rather than cutesy, and understated rather than in-your-FACE!!

He was so excited--there was nothing to do but go shopping!

So what does a woman do, who is trying to decorate in an understated, yet

classy manner? Why, break out the GLITTER, of course!!

I got this idea from someone else's blog--but for the life of me, I have no idea where I saw it. (If you know, leave a comment so I can give appropriate credit!)

I started with chipboard letters from Hobby Lobby.

Next came a little silver spray paint (you'll have to trust me; they're really silver).

Next came ModPodge and lots of glitter...


Finally, some hot glue and black ribbon, and voila!!

It really does look better in person :-) Glitter doesn't seem to translate well to photographs!

My chalkboard got a little makeover as well:

I found a little anonymous poem to write on it:

When witches go riding
And black cats are seen

The moon laughs and whispers

'Tis near Halloween!


I didn't have any black cats, but a raven made its appearance on the upper corner:


My pretty little cloche (that first appeared here) got a pumpkin tower and a glittery black spider (these have made an appearance all over my house with help from my junior decorators).

Oh, and the little black raven has two buddies that are perched elsewhere. They were about $2.50/each at TaiPan.

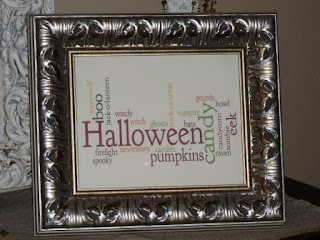
Then I finally had to give Wordle a try. It was so fun! I printed out my creation on some pretty linen cardstock and added it to a frame I had on hand. I already have one made up with just "Autumn"-type words when Halloween is over. One little hint if you decide to create you own Wordle masterpiece...if you can make a bigger word by entering it in multiple times.


So...Halloween decorating. It didn't turn out to be so painful after all! And my children and my husband are delighted!


The DIY Show Off
Photobucket

Birthday Wedding cakes crafts parties