What do you think?
 Don't you just love that lime green finish, and the peeling varnish on the top? Well, I didn't. I did love the pretty curve in the center, and the carved legs and panel on the wide top drawer.
First item of business was to strip the top down to bare wood. This was my first trial of my new orbital sander, and I was in love!! Power tools...where have you been all my life?? Anyway, the big surprise was that there was CHERRY wood underneath! What a nice surprise! The drawers were all cherry, too--which I discovered after stripping out the orange and green 60s wallpaper! (I so wish I had taken a picture of that!)
This buffet sat around in partial nakedness while I worked on other projects. Last week, though, a lady visited my garage to look at another piece I had for sale, and cupid struck! She fell in love with Kermit (what else do you call a green buffet?).
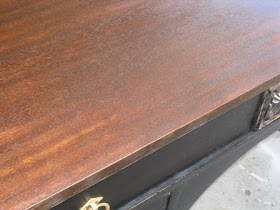
She wanted a classic black with a wood top. Here are the results:

The bottom got painted flat black, then I glazed it with burnt umber to give it a more "aged" appearance. I finished it with several coats of hand-rubbed satin polyacrylic.
 The carvings on the sides I sanded out with my Dremel--that's a tool I have owned for years, but it's been under-appreciated until now!

I didn't do too much other distressing, other than in the carvings. I wanted them to take center stage!

The lady wanted a fairly dark top, but with some hint of the red from the cherry wood showing through. I put on a walnut stain, and I was amazed at how quick it was soaking up the color! I was wiping it off about as fast as I was putting it on, but I think I ended up with pretty good results.

I wish my photography skills were better! Originally we had talked about the center panel being stained like the top, but that didn't look right. You see, these pressed panels are made out of a softer wood (like pine), and it took the stain differently than the top. It just looked dull. So I ended up painting it black and then sanding out the details like I did on the legs.
Here's one more gratuitous "after" shot!

I hope Kermit is happy in his new home!
Linking up:


Forget the 'Willey's'. I'm coming to your garage to shop for furniture!!
ReplyDeleteThis is very pretty! Well done!
ReplyDeleteBeautiful lines on that piece..love the treatment!
ReplyDeleteIt's gorgeous!!! I absolutely love it!
ReplyDeleteIt turned out wonderful, you did a nice job.
ReplyDeleteYou've inspired me to bust out my dremel!!! What a transformation!!!
ReplyDelete